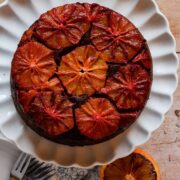
Chocolate Orange Upside Down Cake
This upside down cake recipe is perfect for those who love the popular chocolate-orange flavour paring. Upside down cakes make the most of seasonal fruit, showcasing them to the max. Although the recipe uses blood oranges, it would work equally well with navel oranges at other times of the year, meaning that you can enjoy this easy, pretty and delicious cake any time you want.
Servings: 6
Calories: 351kcal
Equipment
- 18 cm (7in) deep round cake tin
Ingredients
- 2 -3 blood oranges or regular oranges if blood oranges are out of season
- 50 g (2oz) milk chocolate
- 125 g (4oz) butter unsalted & softened
- 125 g (4oz) golden caster sugar
- 2 large eggs lightly beaten
- 1 -2 tablespoon milk
- 100 g (3½oz) self-raising flour
- 25 g (1oz) cocoa powder
Instructions
- Preheat the oven to 180℃ (160℃ fan)/350°F/gas mark 4. Grease and fully line the cake tin with baking parchment or greaseproof paper.
- Finely grate the zest from one of the oranges and set the zest aside. Using a small paring knife cut the peel and pith away from 2 or 3 orange (depending on size). Cut the orange into slices & arrange in the base of the cake tin to completely cover the base.
- Break 50g (2oz) chocolate into small pieces and place into a heatproof bowl and place over a pan of hot water stirring until melted. Remove the bowl from the pan when it has almost finished melting (the residual heat will allow it to melt completely). Set aside to cool.
- Place 125g (4oz) soft butter and 125g (4oz)sugar into a bowl and beat together until very pale and fluffy. Add the grated orange zest and beat again to combine. Gradually add 2 beaten eggs a little at a time, beating well after each addition. then beat in 1 tablespoon milk.
- Sieve 100g (3½oz) flour and 25g (1oz) cocoa into the mixture. Use a spatula or large metal spoon to fold this in gently. Then fold in the melted milk chocolate. You should have a nice dropping consistency – add a further tablespoon of milk if necessary.
- Carefully spoon the prepared batter over the arranged orange slices. Spreading out gently to level. Use the back of a spoon to make a slight indentation to the centre of the batter.
- Bake the cake tin in the centre of the oven for about 50 – 55 minutes until a cake skewer inserted in the centre comes out clean. Once baked, remove from the oven and place onto a cooling rack.
- Turn out the cake. Allow the cake to cool for 5 minutes before turning out from the tin. Remove the lining paper and allow to cool.
Notes
To Prepare Oranges:
- Imagine the orange as a globe, the stalk ends being the ‘poles’. Use a small paring knife to cut off the two poles to create a flat surface. Rest the orange on the flat surface that you’ve just cut. Holding the orange steady on the work surface use the paring knife to cut away the skin and white pith, aiming not to cut into the orange flesh. Do this by cutting strips of peel from the north pole to the south pole curving the knife as you cut around the naturally round shape of the orange. Continue removing strips of orange peel until the orange is completely peeled.
- Turn the oranges on to the sides before before slicing so that you cut across the segments.
- Removen pips from the orange slices before arranging them in the cake tin.
Store
In an airtight container in a cool place for 3 –4 days. Not suitable for freezing.Nutrition
Serving: 1slice (⅙) | Calories: 351kcal
